Monday, August 24, 2015

(Aug 23) IKEA Furniture & Microwave

Well, wasn't what we planned but it all worked out fine. We had thought that we'd plumb the cistern to the house this weekend but near 100° days discouraged us and we were easily distracted to put furniture together. We had been anxiously anticipating getting the IKEA PAX wardrobe put up so that we could start storing some clothes out here. It actually went together very smoothly. Once I figured out how to adjust the hinges on the doors, it looked very nice.


PAX Wardrobe mounted to wall

We were very happy to see that it had survived the last 6 months lying on our living room floor, pretending to be a napping platform for the cats. :)  We didn't find any scratches or dings as we put it together. Also glad to see it went together plumb and square. It fit nice and tight against the wall. We lined it up so that one of the studs matched up with one of the mounting brackets against the back of the wardrobe. We put a 1/2" toggle into the wall through the other corner bracket to secure it. 

We got the closet rod and the top shelf installed after a little struggle to figure out how the shelf pegs were to be oriented. Next was the light. The hardest part about this was dealing with the tiny screws that secured the mounting hardware to the underside of the shelf. We'll get some split loom to conceal the electric cord and drill a hole in the bottom corner of the cabinet to take it to the wall outlet. We had originally planned this unit against another wall. This was going to allow us to have an electric outlet mounted behind the unit. We could then have just cut an opening and plugged the unit in without having to run the cord to an exterior outlet. Oh well, I really like the placement and it's size helps define the living and kitchen areas as separate. 

The light has sensors that come on when the door is opened


Lots of room for now. We'll add a 2nd Elfa rack of drawers when we move in full time. 

 We set the shelf above the clothes rod at 9" tall. Plenty for our pillows. :)  Yes, IKEA had drawer units for the PAX series but we wanted to go with the Elfa drawers from The Container Store to match our kitchen sets. 2 of the wide drawer units fit nicely inside. For now, we'll use the other half of the interior to store our broom, mop and vacuum. They will eventually move to the other cabinet, that will also have a set of Elfa drawers as well as Kim's sewing cabinet, that will be built in the living area against the bathroom wall.

Where the ceiling and the wall meet, we're adding a cove trim. Luckily, we had a 1/2" to spare with this giant wardrobe! :o  It will be just enough room to mount a small block of wood to lock the top of the unit against the wall. I just don't want this to ever get pulled down on anyone, especially a small child or an adult acting like a small child.

Next, we turned our attention to putting the desk unit together. It was too wide for the bathroom wall that it was to go against so we trimmed about 3" off with the table saw. Luckily, there was about 4" of solid particle board in each end of the desk's top that was designed to secure the base of the legs to. We had layed it out in our heads that we would have the drawer unit act as a base on one side and have 2 legs mounted on the other but cutting the width was only going to leave about 18" for leg room in between. After playing with it, we decided that it was too little to sit there comfortable for any time and decided to turn the drawer unit so that it faced the opening towards the refrigerator. This freed up nearly a foot of foot room and was wide enough to completely do away with the legs. I secured the desktop to the drawer unit with some 2" wood screws and it was done! Simple and nice!


Desk, mounted on drawer unit, against bathroom wall


Desk with drawers closed


Desk with drawers pulled out into walk way


We left a little reveal at the front of the drawers and enough room on the back side to accommodate a trash can. Our kitchen trash can is now too tall to fit under our kitchen sink (because of the plumbing) so it will suffice for now until we find something that matches the desk. We also confirmed that the sliding bathroom door that will go behind the desk needs a 2 1/2" gap between the desk and the wall. This also means that the shelves we got for the wall behind the desk will have to be reallocated. One should mount nicely on the bar which will go against the left side of the desk where the dresser is now. We'll put a cork board or white board against the back of the bar and build a hutch over the iMac at the back of the desk to house the printer and any books and accessories we deem necessary. Our scanner tucks neatly under the body of our iMac into the base. We just pull it out, use it and slide it back into place.


Sunday, we decided to head to Greenville to offer our weekly sacrifice to Home Depot. They're starting to greet us there by name now. :) We found an over-stove microwave unit on clearance at 1/2 price. We had been looking at much cheaper units but this one was the right price and offered a nice exhaust fan that we had decided was a must after cooking for the past year in our Tiny House. Pastas, soups, stir-fry - anything that puts off lots of steam and heat, really builds up quickly if you don't have some way to exhaust it. The microwave also gives us a very efficient way to heat water and reheat food. Had really thought that we would do without a microwave because we didn't have a place for it but combining it with the vent-a-hood served 2 needs.


We talked with the HD guys who recommended getting a cabinet to house the exhaust pipes that we'll take out the south wall. We really weren't happy with our choices available since the ceiling is only 8' against the kitchen wall. Funny how all houses had 8' ceilings or lower when we were growing up. Now, it seems like a major limitation when you're looking for appliances and cabinets! Kim and I wandered around the store and decided to build our own support bracket to suspend the microwave/vent-a-hood over the stove, paint the exhaust pipes and leave them exposed. After an hour of standing in the isles contorting with various lengths of steel, we finally came up with a plan we both liked. After some more planning, measuring and cutting at the house, here's what we ended up with.


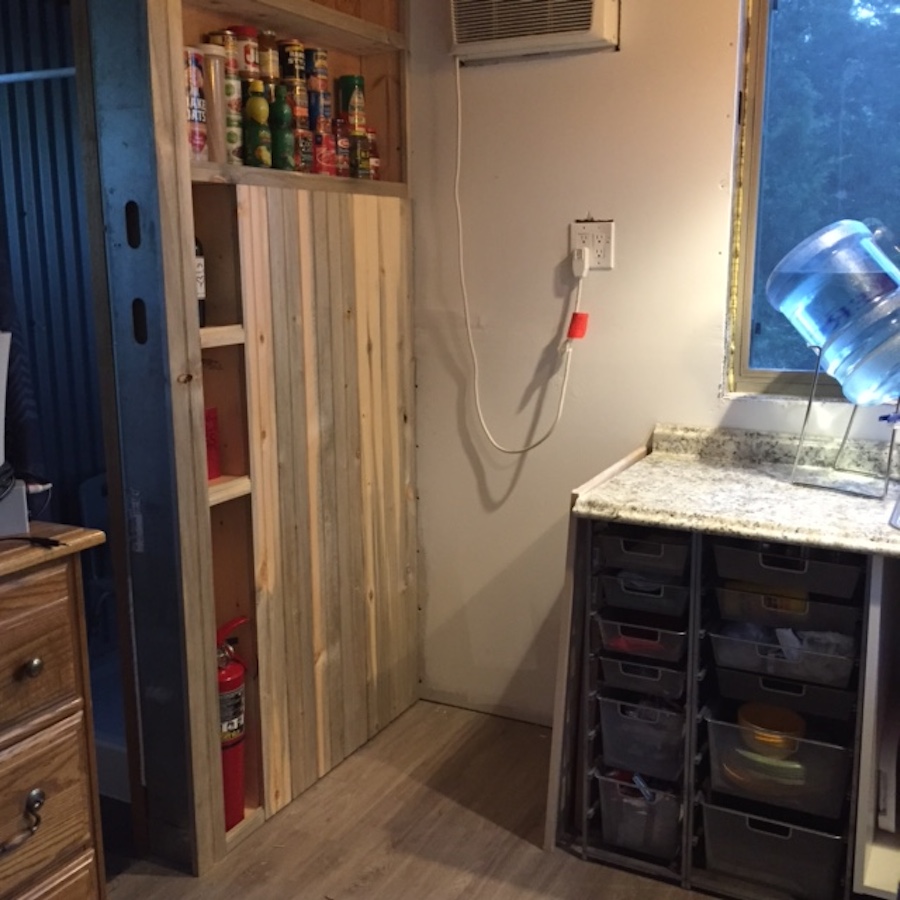
Microwave bracket continues the occasional industrial look used in the kitchen and bathroom


The hardest part of the assembly was getting some good anchors into studs, thus the frame extends wide of the bracket on both sides at the top. Once the top was secured, we added toggle bolts to the verticals and the back brace. The IKEA PAX unit offered a lending hand that was too convenient to turn down. We cut some pine 1x4 as a brace inside and drilled some holes for toggle bolts to secure a run of steel as a shelf on the right wall. I still love our metal saw. It made quick work of chopping this stuff up into needed lengths. I used a cutoff saw to trim off the corners for the support straps.

We ended up eating into the wall outlet space a little to get the unit as low as we could to accommodate Kim's being vertically challenged. (Again, planning would have prevented these challenges by supplying outlets behind the microwave and the oven - but what's the fun in that!) The stove underneath the unit will sit out proud of the microwave by more than 6". She may still end up with a step stool or just call me when there's something heavy and hot to pull out of the microwave. :) I think we will probably modify the kitchen window framing also. May play around with some ideas in steel. I think we could make it work. I just want to make sure we can clean it good and that it won't be subject to rusting. We'll have to put some thought into it. The PAX unit will get a lining of stainless steel or tile on the side, haven't decided which yet, as a shield against the stove.

The unit should match our stove/oven perfectly as it is also Chrome and black. Next week's challenge will include cutting the hole in the wall to take a vent pipe up and out at 90°.  We decided this would be much easier than taking it through the ceiling. Since we put the rafters at 12" on center, there was a much higher likelihood that we would hit one of those in comparison to the wall studs at 24" centers.

Through all of this, our generator had a problem arise. Saturday's tank of gas lasted just over 17 hours. Can I tell you how happy I've been with this Briggs and Stratton generator! Not bad for 4.5 gallons of gas on a 3500+ watt unit. It's been running 24 hours/day every weekend for the last 2 1/2 years and still starts on the 1st pull. :)  Anyway, Saturday night rolled around and the generator shut off. I couldn't imagine it was out of gas since I had filled it up 6 hours earlier. It was cool enough in the house that we decided to go to bed and investigate it in the morning.

The next day, I did indeed find it out of gas. I filled it back up and found the problem. Fuel was leaking out of the back of the carburetor. I shut off the gas line and found the float bowl had something rubbing up against it and had worn a hole through it. I found a bolt laying in the grass next to the generator and suspected the two were related. We picked up some high-temp gasket material when at HD and I cut a patch out of a Dr Pepper can. I let is set up an hour and started to put it all back together when I found the culprit that had done the damage. The bolt I found had been holding on a corner of the shroud that housed the pull-start flywheel. With the bolt out, the sheet metal had been vibrating/rubbing against the float bowl and had eventually worn through. I'm just glad the generator didn't catch fire with all of the gas leaking the night before. Bad enough that I've got a 2 foot circle of dirt that I'll have to treat as a Hazmat site and try to remove. Good news is that everything went back together smoothly and it started right up, with a fresh air filter that I had neglected to change in the past 2 years. :) Hopefully, we've still got years of service out of this unit. Next week, I'll take the time to go through and tighten all of the exposed screws and bolts just to make sure.


Friday, August 21, 2015

(Aug 16) Progress on Kitchen

We really wanted to get the cistern plumbed to the house. Lots of considerations though. Uses for water - shower, washing dishes, cooking, drinking. Not really sure how far we want to trust the quality of the water until we've had a little experience at purifying rain catchment. We'll bring in treated city water at first and work our way towards rain water. Right now, while we're in the dry season, not a lot of rush in getting the gutter hooked up and ready to catch water since there is none! Forecast for the past 2 months has been "highs of 100° or better and little to no chance of rain." I'm not really sure why they even have a weather segment in the news during this time of year. So, we turned our focus on getting the cistern plumbed, primarily to the kitchen.

We decided to start inside the house and work our way out. We hunted at Home Depot for a while and chose a faucet for the kitchen that fit our single hole sink. We still had to route out the hole a bit to get it to line up correctly but the jig saw nibbled away at the stainless steel nicely. I really hadn't put a lot of thought into having a pull-out spray hose on the faucet. I'd have been plenty happy without but after having installed it, I think I'm going to like it now. I installed the counterweight with plenty of length so that we can pull out the sprayer and reach a pot on the counter. This will save a small step of having to set the pot in the sink before we could fill it. If we did away with the counter weight completely, we might actually be able to fill a pot right on the stove when we get it installed. We'll have to see.

New Faucet on double sink.


Kitchen counter with faucet installed and plumbed


The plumbing under the sink was pretty straight forward. Since we don't have a dedicated hot water source right now, we had to cap off the hot water inlet hose on the faucet. We decided that a good water filter would be a must and chose one that would filter sediment, odor, chemicals, heavy metals and parasites. Maybe overkill for rainwater but we're new at this homesteading stuff. :) I'm a bit nervous about the volume of water flow through the filter but we'll cross that bridge when we come to it. We reinforced with a couple of layers of pine to mount the filter to the inside of the cabinet. It takes quite a bit of torque to open and close the filter cartridge so I didn't want to tear out the MDF over time. I also mounted it up pretty high on the cabinet so that I could put a pan under it when I changed the filter. Hopefully, at $50 each, I won't be doing that very often. This would also allow for some supply storage under the filter unit.


Under counter plumbing with filter installed

It was really exciting to get rid of the home depot buckets under the sinks! Carrying them to the woods to dump a couple of times a day wasn't the big deal. I was just worried about one of them spilling or overflowing. The scary part of the install was drilling through the bottom of the cabinet and through the floor for the drain pipe and drilling through the back wall of the house for the incoming water line. I think it turned out looking pretty good. No turning back now!


I decided to finish out the shelves next to the refrigerator corner on Friday before Kim came out. I really didn't like my options of using paneling or sheet rock so I decided to see what the pine tongue and groove would look like. It only took about 6 pieces at $4 ea so if we hated it, we could tear it out and start again. I resolved to the fact that the fridge would sit right up against the wall and be too much trouble to try to keep that section of shelves open. I also wanted to keep items from falling off of the shelf and down beside the fridge, so I left a small lip on the trim sitting proud of each shelf. Kim had played with the idea of having some bead board in the kitchen but gave up on it a while back. One side of the pine was routed into a bead board look. This would give us both what we wanted. I don't even care if she paints it. I think it will still look really nice.  :)

Here's the before and after.

Temporary fridge in corner before finishing the shelves and wall.


After finishing the shelves and wall.


We'll get some 1/4" birch or something smooth to line the back of the shelves. I really don't want to eat up too much space as they are only 5 1/2" deep to begin with. I know it doesn't look like a very large space but the top of the AC is at 8' tall. The full sized fridge will fit nicely! Would really like to bring that out in the next couple of weeks. I just want to finish the side of the cabinet/counter top first. Also need to trim out the AC unit and be done with it.

See ya next week!

Sunday, August 2, 2015

(Aug 2) Cistern Set In Place

Felt like we accomplished something this weekend. We got our cistern set into place at the corner of the house. Yay!! We got to stay with the grandson on Friday night so we didn't make it out until late Saturday but I still felt we stayed busy on Sunday. It was a good day! 

We got the last of the timbers cut and into place. I shoveled a few cart loads of dirt to level the pad while Kim pounded on rebar. 


Kim, finishing off the last of the rebar supports for landscape timbers. 

After we got the frame finished and secured, I backed the truck through the woods and put down a layer of 3 to 4 inches of crushed limestone. It packed and leveled nicely. I'm sure glad we put the couple of loads of sand in first or we'd have to have brought out another load of limestone. We put down some 2x4s to set the cistern on so that we wouldn't disturb the limestone. We flipped the cistern over on it's side and rolled it down the road and through the underbrush to the pad site. We did lay some sheets of OSB down as we went through the woods to make sure that nothing punctured the sides. Once in place, we slid the 2x4 out and let it settle into position. 


Support rails on pad after we added sand and gravel support bed

We got SO lucky! Never really measured the pad site. Just assumed (yes, I hear you!) that a pad out of 8' timbers would be big enough for a 7' wide cistern. As we set it in place, we had less than an inch on any side to spare. I didn't account for the fact that we were building "inside" an 8' perimeter.  I can't tell you the fit I would have thrown if it had been too small. Just another example why you can't plan too much! I'm just thankful we didn't have to move the cistern, tear the pad apart, dig all of the sand and rock back and redo it all. :) We agreed that as much as we want water in this thing, we really need to wait until we have the roof/gutter portion completed and finish plumbing that to the cistern just in case we have to shift it around a bit to match up to the pipes. 


Cistern set in place. 

I've seen some nice examples of where people have used cedar fencing around their cisterns. We may play with something like that down the road. Still, it's actually covered by a lot of growth. As you approach the house, you only see it when you are looking straight down the side. From inside the house, you can't see it without looking for it from from either kitchen window. 


View from side of house

While Kim was sanding away on a support for the sofa, I made myself useful and straightened/cleaned the storage building. For right now, I'm really liking the fact that it's open on the south wall. Yes, the building's completely shaded but it was still reasonable cool to work in in the 100° temps this weekend. I would also like to get a window framed in and installed on the north wall to create a cross breeze and to allow me to cut extra long pieces of lumber without worrying about which end would hang out the open wall. 


Finally got the storage unit organized (mostly) :) 


(Aug 2) Closed-Loop Shower System

I've had a lot of interest and questions about our closed loop shower system. I finally took a quick picture to show the components. It's really pretty simple. 

The Flojet pump  is hooked to a couple of 12v batteries. It doesn't take that many, that's just what I have on hand out there and by keeping them tied together, they both stay charged. The charger is wired to a switch inside the house so that I can turn it off if needed without unplugging it. (We're planning on upgrading this to a solar panel with charge controller/inverter this fall.) The pump has a draw side that's hooked to a water hose that's seated in a 5 gallon water jug that's had the top cut off. The output side of the pump sends the water through a filter (just sediment at this point since we're bringing our water from a city source) and then into the L10 tankless heater from Eccotemp. From here the Pex line goes into the house and to the shower head. I have a ball valve on the shower head that's used to start the flow. When the pump senses the water pressure drop, it kicks on automatically. As soon as you close the valve, the pump shuts off - very quick and self-priming. The water that drains out of the shower, goes right back into the water jug under the house, thus the closed-loop. The system acts just like city water. I did have to purchase additional adapters to tie my pump inputs to a standard garden hose. They make a variety of quick connect adapters for 1/2", 3/4" and garden hose in both straight and elbow versions to make it easy to adapt to whatever you have. 

For now, while the weather's warm, we heat our water in 5 gallon jugs in the sun. One jug per shower, thank you! A couple of hours brings it up to 110° which is plenty hot enough to take a 15-20 min shower depending on how cold we have the house at the time. We tend to keep the thermostat set at 65° to 67° in the summer just because we can! :)

When we need to use the heater, I just open the valve on the propane and the heater unit turns on automatically when it senses water flow. It takes (4) D size batteries for ignition. I will say that you need pretty good pressure to get it to come on reliably. We ended up swapping out our first pump which didn't provide enough pressure and didn't have a pressure switch built in. This one is a Flojet rated at 50 psi for and 2.8 gallons per minute flow. Plenty of pressure and plenty of water. Since it's feeding the water that it's heating right back into a loop, the temperature rises quickly in the storage tank. We typically heat the water 4-5 minutes, again to hot-tub temps, and then shut it off and start our showers. I haven't played with it enough to find a setting that's low enough to have it maintain a constant "very warm" temperature and I typically don't take showers that are longer than 20 minutes anyway. At 4-5 min per shower, a 20lb tank of propane should last us 6-8 months. 

When we're done with a shower, I just dump the water out by a tree and refill it if someone else is to take a shower. If we're staying for multiple days, I run a bit of fresh water through to flush the system. I also pull the filter and let it air dry when we leave for the week. It does OK when we're there taking showers daily but tends to sour a bit when it sits for a week or two without use. We accidentally put one of the water filter cartridges in the wash with our laundry one night. It came out amazingly clean and worked like a champ the next time. Now, we wash them regularly (monthly) to keep 'em fresh. 


Shower system. R to L - water storage and return pipe from shower, pump, batteries & charger, filter, heater & propane.


Closed-Loop shower system diagram


When I build the closet around all of the above, I'll add the bypass and extra valves shown in the diagram that aren't in place as of yet. We'll also have a large propane tank (250 gallon) in place by that time and have it plumbed into the heater and the kitchen range/stove. I keep thinking I need to get something fancier than a water jug for the storage tank but I can't think of anything that will work better and be cheaper. Sometimes you just have to accept the the best solution is the simplest, no matter how plain. :)  We'll also plumb a line from the cistern so that we can fill directly from it when we want. I suspect we will still use the jugs for the most part as they're easy to set in the sun and get heated for free. 

I would also love to put a solar water heater on the roof of the house that would drain straight down to the holding tank and to the kitchen. Maybe a project to take on once we finish construction of the house. Seems a terrible waste of fuel to heat water for cooking or bathing when it's 100° outside for most of the summer. Just like our relatives in Maine that take advantage of the cold in the winter and use a shelf in their garage as freezer overflow, we should look to take advantage of the abundance of heat we have here in the South. :)