Saturday, November 11, 2017

(Nov 11) Building a Front Deck

We’ve lived with the pallets in front of the house for several years now. They were a cheap and easy solution as we allocated money to other projects. As the boards have been eaten away at by the ants and termites, it now becomes a priority. We wanted more than a landing to stand on and wipe our feet off but we didn’t need for it to take over the entire yard. We will expand on it later but likely to the sides. The entrance of the house faces west. I don’t see this as our primary seating area but we wanted it large enough to enjoy a little time in the morning shade. The north side will likely get the largest deck as it will be shaded by the overhanging roof most of the day. It also has a deep view of the property. Let’s get started!


Specs and materials:
12’ x 6’ floating deck with recessed piers
Concrete block piers (14, 12” base, 8” tall, heavy as hell)
2” x 6” pressure treated joists on 24” centers (7 x 12’, actual dimension 1 1/2” x 5 1/2”)
Galvanized flashing covers for the joists (78’)
2” x 6” pressure treated deck boards ( 13 x 12’, actual dimension 1 1/2” x 5 1/2”)
Galvanized joist hangers (14 for interior joists)
3” Treated deck screws (about 250 for the deck boards)
1 1/4” Treated deck screws (108 for the joist hangers)
3 1/4” Galvanized 16p nails (54 to nail the joists to the rim joist)
Construction Adhesive

Concrete piers should give us a base that will last forever (my forever) and be easy enough to build around. We ended up setting 14 of them for the 12’x6’ deck. We don’t have the height available to put in a beam and joists as the land slopes down towards the house. We also decided to use treated lumber in contrast to the steel frame that we built the house out of. We want it to last a long time but it won’t need to be as permanent. We also decided against attaching the deck to the house. This way we could avoid the construction portion of having to cut and reconfigure the siding on the house to accommodate and attach deck.


Pallets removed and bringing in deck blocks


Although I don’t expect this to last 100 years, I did want to give it every chance possible. I had seen articles talking about protecting the tops of the joists from water accumulation damage. Where the deck boards meet the joists tends to hold water and will eventually erode the pressure treatment and rot the board out. Several projects I saw used rubber window flashing over the tops of the joists. I knew that the adhesive would eventually fail though and was not sure where that would leave us. I decided to use metal flashing instead. A galvanized steel umbrella over the top of the joist should offer pretty good protection and keep the water from rotting them.

I went to our local DIY center, Hooten’s, in Emory. I hesitate to call them a hardware store. They do way more than that. They have a full-service metal fabrication operation also. They will build just about anything you desire to your specs in addition to carrying a full line of wood, concrete and steel building materials. Think of it as a Home Depot on steroids. They took some simple 3” wide flashing and folded it to match the 1 1/2” top of the joists while I waited. Great service!


Trimming joist covers to overlap


I didn’t need to connect the caps to the joists. The deck screws going through them would be plenty. I think they came out pretty nice. The cost was about another $50 on top of the $500 for the rest of the deck materials. An extra 10% to double or triple the life of the deck seemed to be a good investment.

Laying the deck blocks and getting them level was the hardest part of the project. Each block is nearly 50lbs. We would dig out a location and set the block in to get an initial assessment of position. Then, we had to lift the block out of the hole 3-4 times to raise or lower with additional dirt until it was level. We got quite the workout that day for 2 old fat people. We didn’t want the blocks exposed at the edges of the deck so we set an additional joist at each end about 5” inside the frame. That way the block wouldn’t be proud of the deck on the perimeter but it would still give us good support at the ends of the deck. We also set the inner blocks the same way about 1’ in along the front so they wouldn’t be exposed. Hopefully, you can see that in the photos. Anyway, it explains why there are 2 joists close to each other on the ends. The additional joist member (flush together was to support a perimeter border deck board but we later changed our minds about that design. Too many complications with wet wood.)

Joists in place


We set a block at the entrance of the house to make sure the elevation was correct and then worked out from there. We had to set each block itself level and then raise or lower it to match the original block. We also left a slight slope away from the building of about 1/2” just to make sure water would drain off of the boards away from the house. We filled in much of the space between the blocks with dirt, being careful not to get up to the joist level, to discourage animals from camping under it. No guarantee but it seemed like a reasonable effort.


Deck blocks in place and leveled


Next, we built a perimeter frame with our 2x6s and made sure it was square by measuring across the diagonals. We mitered the ends so there would be no butt joints exposed. We used our framing nailer with the 3 1/4” nails to put the frame together along with some construction adhesive. We also picked up some wood preservative to treat the cut ends of the pressure treated members (joists and deck boards). Pressure treating rarely penetrates the entirety of the wood so cutting an end off exposes a vulnerable entry for insects. All I could find was a gallon, again at Hooten’s as HD & Lowe’s have stopped stocking it in the stores, although we barely used a pint. I guess we’ll have a lifetime supply. :)


Each joist attached with joist hanger and then nailed from the outside. We had to stand the structure up to nail the backside closest to the house.


Now we cut the inner joists and laid them in the blocks. We blocked up the perimeter frame and set it level and attached the joists with galvanized joist hangers. We used 1 1/4” deck screws to attach the joist hangers to the frame and nailed the outside frame to the butt ends of the joists with the nails as nails handle sheer forces much better than screws which tend to be brittle when stressed with side forces. Now we capped the entire frame with the water shields I had fabricated and got ready to lay the deck boards. We left about a 1/4” overhang on all sides with the deck boards and had built the frame accordingly. We laid the 12’ 2x6s (uncut) in place one by one and screwed them into place with 3” coated deck screws. The screws didn’t seem to even notice the metal flashing they had to penetrate. Be sure and set the crown of the wood so that it will create a dome on top of the deck boards instead of a cup. Hopefully, this diagram helps.

(borrowed from decksgo.com) Wood wants to flatten out as it's cut from a tree. Look at the end grain to determine which side was the bark side and which was closer to the center of the tree. Put the bark side down (right side of diagram) and the wood will tend to form a dome, letting water drain off the edges. If you put the wood with the bark side up, it will cup and hold water in each deck board. 


We set the straightest board we could find in the 1st position as it would set the pace for the others. We would screw one end of each deck board into place and then use a ratchet strap to pull it tight against the other boards as we went. The wood was still pretty wet from the pressure treatment so we didn’t set any gap. The boards will shrink up just a bit as they dry and leave about a 1/4” gap between the deck boards. We set one end of the deck boards flush as we went and left the other end of the deck jagged as boards are never the exact length from the mill. We’ll let this dry for a month or so and then pop a chalk line and trim them all even with a circular saw, again treating the ends after they’ve been cut.


Add caption


Finished deck. Nice project for 2 days. :)


I later went back through and finished setting the screws into the deck boards. This burned through 3 batteries on my impact driver. I highly recommend an impact driver instead of a plain drill/screwdriver. You’ll understand why the 1st time you use one to drive long screws. My Porter Cable 20v never hesitated driving the 3” screws. Be sure and wear eye and hearing protection. Driving ~ 400 screws will take its toll.

Just a note on working with wood. Everything I had done before had been with steel. It is very exact, very straight, very precise in length and depth. Wood is exactly the opposite. It’s warped and bowed and cut to varying lengths and thicknesses. It swells (at different rates) when pressure treated and shrinks as it dries. Screws and nails don’t drive in straight as they have a tendency to follow the grain. Wood tries to arch as it continues to relax after it’s been freed from its tree form. Lots to consider. When I meticulously drew up our plans for this deck, I didn’t take into account that the wood would be thicker and wider due to being wet. I planned on 13 deck boards at 5 1/2” wide. Between the swelling and the fact that they just won’t lay flush against each other, I ended up with an extra 1” hanging off of the edge of the deck closest to the house. The reasonable thing would have been to run that last board through our table saw and trim off the inch. Instead, we hooked the entire deck up to a couple of trees in the yard and pulled it away from the house another inch with ratchet straps. (Incredibly heavy by now) If it don’t fit, get a bigger hammer! lol  We were just too lazy to dig the table saw out of the storage building as it was buried with beekeeping supplies at the time. Plan accordingly. Either plan ahead and let your lumber dry for 3 weeks to a month before you start your project OR count on the room necessary for each board to be a bit wider than 5 1/2”.

We really enjoyed this project and will enjoy the deck even more over the next 30 years. Anything past that's a crap shoot - for us, not the deck. I hope it gives you some insight and helps you understand the factors in building your own simple deck. Best of luck, bless you and have a great holiday!

Sunday, April 23, 2017

(Apr 23) Bees! Bees! Bees!

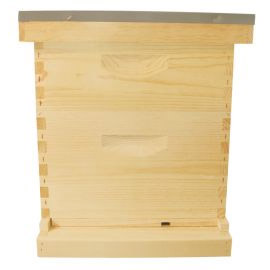
OK, this past couple of weeks has pretty much just been about bees and looking forward to Earthday. We bought a full hive from someone in our bee club. We bought a swarm that someone caught. We caught our own swarm, and now we have 2 more colonies (Nucs) we are buying at the end of this week. Lots of prep time getting the boxes painted, cleaned up and ready for their new occupants. We've also been to several classes this month in prep. My head is swelling with bee knowledge. I look forward to the day that I know what I'm doing, though! We keep coming to conclusions of what we should be doing and then we run it by a seasoned beekeeper only to find out that we're still really green and don't have a clue.

That's alright! It's what this first year is about. We were told early on that if we managed to keep our bees alive for our first year that it was just a bonus. The real goal is to learn. Learn what the bees need. Learn what not to do. Learn what we should be doing and when to do it.

After a great weekend of volunteering at the Tiny House Village at Earth Day Texas, we came out to the Tiny to transfer the swarm we had caught to a permanent box. We were absolutely shocked at how busy they had been. They took over our swarm trap about 30 days ago and got after it. We really shouldn't have left them this long I guess. We made a real mess of trying to transfer the comb to the new box. Some of it was 18" deep but we only had room for 11" deep in the new box. I also wasn't prepared for how soft and pliable it was, literally breaking apart in my hand.

After tearing up most of the comb, we decided to get the rest of the bees in their new hive and just let them get back to doing what they do best. They were pretty upset and my smoker had run out of fuel. I had let Kim wear the full suit and I was only wearing a veil and some gloves. Mistake! Next time, I need at least a full jacket with an integrated veil. I got stung 6-7 times while we were performing the transfer. You just have to work through it and get it finished. I'll be better prepared next time! Count on it!

Here are some photos of us discovering what's in the swarm trap for the 1st time!


Swarm box hanging on the side of a tree at the back of our property for the last month.


Kim, getting ready to open the swarm box


1st hint that it was really full was that she could barely lift the lid it was so heavy!


Yeah, I'd say they's been busy. That's 18" of comb hanging from the lid!


More hanging in the box still


This is a lot of bees!


I'm guessing we had 8-10 pounds of bees along with another 10-12 pounds of comb with brood, honey and pollen. I need to shorten the swarm box so that they can't draw comb that deep. We're also going to use deep frames with no foundation next time instead of top bar frames. That should facilitate them moving to a deep box much easier.

I also got new bottom boards with slide in shelves installed in all of our boxes. I think this was the mistake that caused a swarm we had previously caught to leave again. The box they moved into had a regular screened bottom that let in a lot of light. I'm told they really like it dark when they take over a new location as evidenced by they're obvious appreciation of the swarm trap that only had a small slit cut in one side.

The other thing I added to all of our boxes were trough feeders. These are 1-gallon hanging feeders that go inside of the hive. It lets them better protect the food (sugar water) from other raiding hives as well as allows them to eat throughout the night and continue working. They don't mind the dark and it takes lots of food/fuel for them to produce that much wax. This time of year, they could litterally go through 2 gallons per day per hive. We mix up the syrup at a one-to-one ration (by weight) of water and sugar. A gallon of water weighs 8 pounds. To that we add 8 pounds of sugar. We've been paying about 50¢ per pound for sugar and are looking for a cheaper source. Combined, our hives could go through well over 100 pounds of sugar per week in feeding season!

Here's a video on YouTube of us transferring them to the new box. It's not pretty!

We'll do another follow-up when we get the 2 Nucs this weekend. Hopefully, they'll go a bit smoother. :)


Sunday, March 12, 2017

(Mar 12) Beekeeping Prep

We got our 1st bee box painted and ready to receive bees next month. We've been given an adoption date of Apr 28th. :)  That's when the 1st wave of bees will be ready for pickup. I'm a bit nervous. Not about keeping bees, about losing bees. I really want to do a good job managing them so that it's a win-win situation. I want the bees to be healthy by natural means as much as I can. I also want the bees to not only survive but be fruitful and multiply. It's kinda scary as I talk to members of our local bee club (Trinity Valley Beekeeper's Association) and hear about colonies that leave or don't make it at all. There are lots of possible reasons for this and I really want to avoid these scenarios where I have control.

I think that the bees should be given free reign to manage their own affairs where practical. I want to provide them with a safe environment to raise lots of little bees and store their crops (honey!). I want them to be disease free and manage the pests that are present to a tolerable level. I don't expect them to be completely free of things like varroa mites and hive beetles. This seems impossible these days, even with lots of chemical intervention. I would rather raise bees that are tough and savvy and able to defend their own homes without my drowning them in chemicals that are intended to help them but in the end make them dependent on such.

There is a proposed change to the statewide management of beekeeping in the state congress as we talk. After much examination and discussion about the content, we have come to the agreement that as it is, it would be worse for Texas beekeepers than the outdated laws that have been on the books since the early 80s. If you want to make a difference in beekeeping here in Texas, please contact you state representatives and senators. Let them know that the proposed bill (House Bill 1293) is too riddled with ambiguous language and errors. There are proposed changes to this bill but it's uncertain if they can or will make any of those changes in time to get them approved and passed this legislative session. There is a website that has been set up to let beekeepers monitor the progress of this legislation at www.savetexasbeekeepers.org. Please visit it to understand the issues at hand.

Any additional support from the public would be greatly appreciated!

Back to our situation. Here's a stand that we made out of steel that we had left over from building the house. It should provide many years of service for minimal effort and money. :) We built it to support 2 bee hives. One each, centered over the cross braces for support and safety in case the hive slides forward or back. We put a little shelf at each end as a place to rest tools and such. We made it wide enough to be able to pull a box off of a hive and set it in the middle as we work the hive. We set the width based on the need for frame support. The rails are the same width as the supports inside the hive boxes so that we can pull out the frames and hang them from the rails as needed. We left room to be able to put frames on both sides of the box as well. Not a very sophisticated stand but a lot of thought went into it and its use.


We will likely build several more as we will need to support 5-6 hives this first season. We can adjust the design as we get some experience. If anyone out there has any beekeeping experience and would like to chime in, we'd love some feedback. We've already had several people ask about our making/selling the stands commercially and would love to hear of any interest.

Here it is with a hive on it:


Also made some improvements to our bar. We added a glass shelf and are playing with some tiered shelves. Here's an updated photo. :)  We are still trying to decide what to line the inside walls with. We've found several nice options but they turned out to be as expensive as the entire cabinet! We'll keep our eyes open and hope something jumps out at us. lol


Just a final note on our electric use so far this year. January ended up at $11.90 in electric use. February wasn't nearly as cold and netted out at $1.10. For March so far, we have a 60¢ credit! :) Our solar panels don't put out huge amounts of power but It seems I've got them sized just right for our current needs. If I had added another panel (and inverter) for $400, I could be enjoying $0 bills - but it would take a long time to make up the extra $400. Better to pay the couple of dollars per month until we find that our use is climbing than be upside down and trying to make up the extra cost of the other panel. I think that makes sense!

Here's a chart from our electric company on our daily use. The orange bars are the electric use. The black line is the temperature that day. Dips below -0- are where the panels produced more power than we used. Great tool to teach you how to use your power conservatively. :)


Sunday, February 26, 2017

(Feb 27) Enjoying the New Year

Been a while since I've posted. Amazing how quickly time flies by. The weather has been unseasonably warm. We've had a number of days in the 80s here in February! We did get down to almost freezing this past weekend though. I will say, it's odd to see mosquitos buzzing around with fur coats on! lol

We finished (for the most part) our Tiny House this past Fall. We're still going to re-work the water lines coming into the house but that will likely come when we build a pump house. We're OK with bringing in our own water at this point. We pretty much have it down to about 15 gallons per day, including showers. I did re-install the DC pump and a new 12v deep-cycle battery under the sink to have running water there in the kitchen. I keep reminding myself that carrying 40 lb jugs of water is good exercise!

House with the door painted


We have also changed the storage up a bit in the living area. We took down our metal Elfa shelves and put in another cabinet from IKEA. I know a lot of people really liked the wire baskets but this will be more practical for our daily needs. It fit perfectly in the spot we had and I think it looks great. This unit will serve as a bar and various storage including bedding. It's 96" tall. The 2 sections are now 15" wide and 24" wide. Both are 24" deep. We've still got some lighting and a shelf to install in the bar but it's looking good so far! :) Here are some updated photos.


Looking from the door in


Bathroom and cabinet area


Here's a nice picture of the West wall. Not sure if I had posted once since we re-worked the window and door trim.


View from the kitchen towards the living/sleeping area. 


We went out to an open-house event for the supplier (Texas Bee Supply) of our honey bees this weekend and picked up our hive kits. Our bees won't be in until late March or April but we're really excited to make some progress. We also got a great tour of their sister company, Desert Creek Honey. Amazing the amount of honey that 5000 hives can produce! We were both so impressed with the owner, Mr. Shook, when he came out to our local beekeepers meeting that we were glad to support him in his new business venture of selling beekeeping supplies. It's great too, to find an honest honey supplier in your own area. Many honeys purchased from a grocery store that claimed to be local, raw honey were actually a blend of foreign (mainly Chinese) honey as well as corn syrup, thus negating the health benefit of consuming products with a bit of pollen from your area. The people from Desert Creek Honey were upfront and honest about where all of their honey comes from. You should give them a try. Great products. The creamed jalapeno honey spread is excellent on fresh cornbread!! :) (No, I didn't get as much as one free bottle of honey for my endorsement. I really like the people and their products!)


Sunday found us painting these and putting the swarm box that we built up in a tree to entice some swarming bees to take up residence. I think Kim and I are both going to enjoy being beekeepers. Everyone we've dealt with so far has been really nice, just like the Tiny House community we've become part of.

We attended a bee biology class recently, taught by Ryan at the Trinity Valley Beekeeper's Association. They (the bees) are absolutely fascinating. The queen can lay 2000+ eggs per day for life off of one mating flight but can't feed herself. Female bees do absolutely all of the work in a hive, from the day they hatch 'til the day they die. Male bees (drones) are pretty much good for one thing, breeding to a queen, hopefully from another hive. If successful, they die immediately. If unsuccessful, they are all kicked out of the hive in the fall to starve to death. Since they (the drones) do no other work, it would be impractical for the hive to support them through the winter. After all, the queen can produce more drones at will in the Spring by deciding whether to fertilize the eggs she's laying or not. Fertilized eggs hatch as female workers. Un-fertilized eggs hatch as drones. If the queen slows down her egg production, her daughters gang up on her and either kill her or they conspire to produce a new queen who will do it for them! It's a no-nonsense species. All business, all the time. Something to respect in that. :)


Honey bee collecting nectar (to make honey) and pollen (to feed baby bees)

If you find that a swarm of bees has left their hive and taken up in a tree or bush on your property, take the time to call a local bee club. They will likely have someone available to come and rescue the bees. Everyone wins! The bees are very docile at this stage and are easy to handle so there's actually no danger of them attacking you. Their bellies are full of honey and they're just looking for a new home. :)


Swarm of honey bees waiting to decide on where their new home will be!

We got a nice series of showers on Sunday evening, also. Not sure there is anything better than a Sunday snuggled up with your wife, watching movies and listening to the rain fall on the cabin you built in the woods. I'm very grateful for Kim and all we've accomplished together over the past 10 years. :) Here's to you, Sweetie!

I'm working on a system to start propagating Chili Pequin pepper plants out on our new property. These are a great little pepper that packs a punch, up to 30x hotter than a Jalapeno. We have a number of plants at our house in Arlington but I've not had any luck in getting them to come up from seed here in the woods. After some research that I should have done in the first place, I find that the seeds have a very tough outer cover and have to get some assistance to germinate. The most popular way is to pass the seeds through a bird. Most likely a Mockingbird. The stomach acid helps thin the casing around the seed as it passes through. Also, they need very warm soil (80°-90°) and very little of it to get started. Preferably less than 1/4" covering them as they germinate.  If you come to any of the Tiny House events at our place in the future, remember to ask me. I'll be glad to give you some start seeds. :)


So - I'm going to get a starter set and soak my pepper seeds in a bleach water solution (preferred method of softening the seeds. You can also use battery acid. NO JOKE!). These guys are tough! They are the only native pepper plant to the United States, growing wild throughout the central and South Texas regions down throughout Mexico, thriving in a mix of sun and shade. Since there are no hybrids, they all have the potential to propagate. They do take a long time each year to get around to their 1st crop, often taking 150 days or more. Thus the reason to start them inside in the winter, if you can keep the soil warm.

More pics next time of the bee hives and an update on the local deer. We're really hoping that we have a number of fawns this Spring. Most of the does we've seen look pregnant. Very Exciting!!

See ya then!

Friday, September 9, 2016

(Sep 5) 3 Yr Anniversary and 1st Boarder

As Labor Day weekend rolled around, we were flooded with memories of our build. This would mark the 3 year anniversary of the weekend that we first started working on the house. I must say, I was pretty pleased with the weather (92°) this weekend compared to 3 years ago when it was over 100°. We've come a long way and are enjoying a lull in the work load. We did get most of the metal roofing put on the storage building this weekend but most of the activity this week had nothing to do with our house, but primarily getting a site ready to accommodate our 1st Tiny House tenant. More on that in a moment. Here are some photos recapping our journey over the past 3 years.


Location picked and started clearing.  That's me in the background cutting down trees and brush.  I'd cut and Kim would clear.


After clearing the spot we marked it for the foundation.


Foundation built and decking started


Deck on and frame built.


Sheathing, roof and windows installed 


Finished product!  Woo Hoo!!

I must say, I can feel 3 years of construction in my bones every morning when I get out of bed! lol It's been incredibly fun but a lot of work. I'm really happy to move to another phase where most of our work goes into improving the landscape. I am not a meticulous landscaper. I will never have, nor do I want the manicured urban yard. I don't even own a working lawn mower at this time. I would gladly put up a "Nature Preserve" sign in my yard in Arlington if given the option. That said, I like the "natural" look of woods and meadows. I try to keep a small path cleared to the back of our property here but I definitely don't go out of my way to manicure the forest. The fact that most of the property is covered in huge Oaks and Elms aids me in my desire for a life spent doing something other than riding around on a mower (as some of my neighbors do) for many hours each week. Things just don't grow in the shade like they do in a meadow and that's a good thing. :)

We made a big decision this month, to allow others in the Tiny House community to move out to our property under a rental agreement. We had agreed in the past to let a friend use our acreage to build his Tiny but we wrestled with the idea of someone living here with us permanently. We broke that ground this weekend when a friend that we met through our Tiny House group here in North Texas was faced with eviction from the location that she had been staying at for the summer. Demere O'Dell has now joined us here in the forest and we couldn't be happier! She's personable and polite and funny and we got a solid warm fuzzy impression that she will be a responsible and fun neighbor.

She came out to view the property the weekend before and make sure she could stomach the hour+ long drive back to Dallas to work every day. She agreed the land was gorgeous and seemed genuinely excited at the prospect of living a more peaceful life in a remote and heavily wooded forest. :) We made plans to transition her residence over the upcoming holiday weekend. Welcome, Demere! We're thrilled to have you here!

Our first task was to provide access to the property for a 14' tall vehicle. Hmmm. We ended up bringing out 4 truckloads of road base and shoveling it out along the 750' heavily treed driveway in doses to smooth out the rough spots. Truly didn't take long, about an hour per load including drive time. It's just exhausting when the temps are in the 95°-106° range as it was earlier this month. We also trimmed back a number of limbs that would potentially scratch/damage the Tiny on its journey.

Next task was to establish a hookup for her 240v/50amp electric service. I decided that to be fair, I would need to measure her electric use, rather than guess each month. I bought and installed a double pole breaker, an RV-style outlet as well as a meter base and meter and did all of the wiring with the appropriate gauge wires. As you may or may not know, 240v service is achieved by providing (2) 120v hot wires accompanied by a single neutral and a single ground. The (2) hot wires must also be in phase with one another. They must come from opposite feed sides of your breaker box. Each side of your breaker box has a line (120v) from the service company coming to it. These are always live and come straight from the meter. When combined, their voltages double to 240v. It's not enough though to just have (2) 120v lines though. They need to compliment each other by working together. If you had (2) 120v breakers that were hooked up to the same feed from the service company, it would typically not work in a 240v appliance since they are considered out-of-phase. There's probably a more complicated explanation of how it all works together but that all you're going to get from me today! lol Anyway, this new life that we lead out here provides me the opportunity to learn something new nearly every day. :) Gotta love it!

I checked around to find a simple meter but no one had one in stock on the day that I needed it. At ~$70, it wasn't going to be a huge expense, just an inconvenience to have to wait on one to be shipped in. I called around and was super pleased to find a source that had a mechanical meter (as opposed to the new smart meters) that I was offered for free! :) It wasn't going to need to be compliant with the latest building codes or report back to the mother ship (elecdtric company) and besides, I love watching the wheel spin around with use! I miss that with the new meters although I love being able to log in and look at my usage every day. I cleaned it up a bit and reset the meter to zero. Just like new and good to go!

New electric meter for our new renter! 

The outlet is called a 14-50R and it was a pain in the butt to wire but it was much cheaper (about $80 including the meter base and meter!) than the $850+ that an electrician wanted to charge me to provide and install them! Choke! :) I love living in an area where permits and inspections are not required. That said, I read over technical notes for over an hour to make sure that I had a safe/sound plan. I spent 3 hours driving and shopping for the supplies and it took me 2 hours to install and test. A good investment of my time!

Demere had not been able to use her newly installed mini-split AC since she didn't have access to 240v service at her previous location. She was thrilled (as I was) that it and all of the other electrical features in her Tiny fired right up when we plugged it in. The bad news was that about an hour later, her new AC unit started leaking water inside her house. :( The installer had not been able to test it at its previous location and there was a problem with the drain line that we could not resolve on the spot. Her quiet cool nights would have to wait another couple of days. We loaned her a regular window unit AC until her AC guy can get out to fix the problem. Hey! It's a nice ride through the countryside to get here! Right? :) At least she gets to enjoy the cool. Its just not nearly as quiet. Hopefully he will get it resolved soon.

Kim spent a good amount of time clearing brush and weed eating the area that would be the new home for The Little Fish as Demere has named her. I cleared the front of the property of the chest-high weeds so that she wouldn't be afraid to pull into our driveway. :) When they arrived, we all took a final walk down the drive and voiced opinions about any potential problems and bottlenecks. An entourage of helpers had come in tow and everyone would have a job to do to make sure this went over without any injuries to the house or its carbon based caretakers. Thanks to Mark, Cory, Rob & Robert as well as Demere's daughter and granddaughter for all of their help!

Parking the Tiny took a couple of hours to manuever into just the right position, level and get some last minute brush trimming done. It is so darn cute now, sitting there in the woods, glowing softly among the cricket chirps and coyote howls. Life is good! :)


Here's Demere and her caravan driving down our road


Pulling down the driveway to its cozy spot in the woods  :)

The good news was that we got all of it done without any major hick ups. We brought out our gas grill and made a mound of grilled burgers, hot dogs and brats. There was very little talking for the next 30 minutes. Sadly, I missed this opportunity to take a group photo and document all of the helpers' presence. You were all appreciated!!

On a note about nature. This spring saw our first major invasion by wild hogs. They were here on the property on and off for a couple of months, rooting up our road as well as the open woods. We hardly saw a deer for this period and stopped putting out corn in fear that we were just encouraging the hogs to stick around. The swine have long since moved on and now it appears the deer are back in full force. Here are a couple of videos that our trail camera captured behind our house this week. :) First time we've seen spotted fawn here. It was pure pleasure. :)


Click here logo to see it full-sized


Click here to see it full-sized


Click here to see if full-sized


Monday, August 1, 2016

(Jul 31) Roof Finally Finished


My hand was finally well enough after surgery to get back on the roof. We had some flashing customized locally and got the last of it put up this weekend. SOOO happy to have this finished. I won't have to get back on the roof until time to do my quarterly sweeping. :)


When you're living Tiny, it's hard to get through a week without talking about poop! lol We got our ventilation fan installed in the loo cabinet. Again, I hate cutting holes in a perfectly good floor, but . . .   I took a 3" AC fan and built a box around it. This will help channel the air going out as well as give us a good seal against the floor to keep out the bugs and critters.


Sorry I didn't get a better picture of it. I'll try with the flash next week. It sits directly between the bucket for the solids and the container for the peat moss. There was only about an 1/8th" to spare on either side. :) I'd like to take credit for planning it that way but if you know me, you know better. We stopped in our favorite organization store (The Container Store) and found the perfect bucket for solid waste. It fit like a glove into the opening we had left over after installing our diverter and pipes. It's 12 gallons so it'll be able to hold a lot more than the 5 gal homer bucket we were using before. It also fits up under the diverter like it was made for it. Good Find! :)

Bucket for solids in our composting toilet. 

My 2 criteria for replacing our old bucket were a larger capacity and handles. This fit the bill nicely. I'll have a couple of months before I have to commit to a site to start the compost pile. I'll build it up with some landscape timbers before piling it up with poo. lol Once filled, I can stretch some landscape fabric over it to let it cook. We'll leave it for about a year while we start another compost pile. Then, we can plant directly in it - no need to shovel and move it. Just build it in a location that you'll be happy with some landscaping.

I can't tell you how exciting it is to get down to the last couple of items on our punch list. We'll do some touch-up painting next week as well as add an electrical outlet behind the stove. (I told you I didn't do extensive planning!) There is one there but it's above the top of the stove and we're tired of looking at the extension cord hanging down. I also need to rewire the junction box for the outside lights to try to fix a problem with the LED lights flickering.

I took off a couple of days with my girls to go to the Texas coast (Rockport) for my mom's 80th birthday. It was a good trip. Went to Port Aransas to put our toes in the ocean for a bit. We ate fresh seafood every day and brought back lots on top of that. Hard to pass up Red Snapper filets at $6/lb fresh off the boat, especially when they want $24/lb for it here in DFW. Also got lots of shrimp and crab. Still enjoying the gumbo this week! :)

With the daughters on Padre Island. 

Hard to believe they've pulled multiple 1000+ lb sharks in off of that pier behind us. Amazing that there are hundreds of people swimming and surfing in the area and I've only heard of a couple of shark attacks in the 40 we've been coming here. I swam here many a day when I was living here. 


Tiny Houses for rent on the road to Padre Island


We've really enjoyed our bird watching area outside the South window. We set up a seed feeder, a suet cage, multiple hummingbird feeders and a solar powered fountain with a birdbath. The constant flow of birds throughout the day offers instant relaxation and enjoyment. We were graced with some fresh faces over the past couple of weeks. Here were the latest to show off their brilliant colors in our little garden.


Painted Bunting. This is the first year we've seen these. So inspiring!

Summer Tanager (male) We saw for just moments last year but we didn't have a fountain up then. Now they're regulars! :)


Summer Tanager (female)


Fountain with Summer Tanager getting ready to take a dip! :)


No, these aren't our photos. Our little bird paradise is completely shaded throughout the day. Combine this with our dark window tint and it's impossible. We've taken literally hundreds of photos but they just won't capture the brilliance without sunlight on them. The window tint is nice in a sense that it allows us to sit inches away from the birds without them seeing us but it does restrict the photos we can take.

We're going to play with an app for our iPhones I saw. It lets you use one iPhone as a remote control for the camera features of the other iPhone. You set one up in a location that's nice and close, then you sit inside and hit the remote control to take photos when the birds are merely inches away. We should be able to get some nice shots I believe.

I've created another page here for the blog that shows off the birds that we have entertained here in our little wooded paradise - Our Birds.

My wife, Kim, is so talented. I was a bit skeptical when she volunteered us to make a sign for the DFW Tiny House Enthusiasts to gather 'round at the Jamboree next week in Colorado Springs. I must say, she came through and I couldn't be prouder.


Kim with our new Meetup sign! 
We were having trouble finding someone who could fit the shepherd's hook in their vehicle that was going up on Thursday. We ended up at the metal shop at Hooten's Hardware in Emory. Tim, their resident metal guru, took a few minutes and come up with a great solution. He cut the shaft in half and threaded both ends with a die and then married the two halves with a long open ended nut. You can easily take it apart for transport and put it back together at your site. :)  Again, great job, Honey!! Look for us when you get to Colorado next week!


Here was the kitten, Bella, that was at Hooten's hanging out with her best friend! :) What a sweetie!!


Our Birds

I wanted to have a place that I could post pics of the variety of birds that visit our little paradise in the woods. We see other birds in the neighborhood but these are ones that we have witnessed on our property. We are about an hour east of Dallas in a region they call Post Oak Savannah, just before the piney woods of East Texas. As I've stated elsewhere in our blog, these are not our photos. I've borrowed them for display. Our birdfeeding area is shaded and we've had no luck taking photos. We're just pleased that they grace us with their presence and antics daily. :)


Painted Bunting


Summer Tanager (male)


Summer Tanager (female)


American Crow


Blue Jay


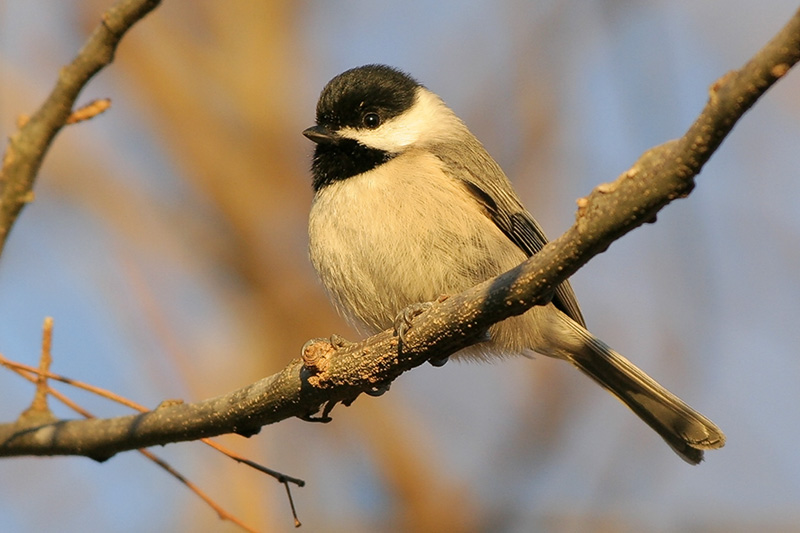
Carolina Chickadee

Carolina Wren

Ring-Necked Dove


Northern Cardinal


Red Tailed Hawk

Ruby Throated Humminbird

Tufted Titmouse


White Throated Sparrow


White Breasted Nuthatch


Dark Eyed Junko

Yellow-Bellied Sapsucker

Ruby-Crowned Kinglet

Red-bellied Woodpecker


Downy Woodpecker


Black Vulture (black head and white wing tips)


Turkey Vulture (white along length of wings and red head)

Brown Thrasher. About the size of a Blue Jay.

Wood Thrush. Very active!