We decided to start inside the house and work our way out. We hunted at Home Depot for a while and chose a faucet for the kitchen that fit our single hole sink. We still had to route out the hole a bit to get it to line up correctly but the jig saw nibbled away at the stainless steel nicely. I really hadn't put a lot of thought into having a pull-out spray hose on the faucet. I'd have been plenty happy without but after having installed it, I think I'm going to like it now. I installed the counterweight with plenty of length so that we can pull out the sprayer and reach a pot on the counter. This will save a small step of having to set the pot in the sink before we could fill it. If we did away with the counter weight completely, we might actually be able to fill a pot right on the stove when we get it installed. We'll have to see.
 |
| New Faucet on double sink. |
 |
| Kitchen counter with faucet installed and plumbed |
The plumbing under the sink was pretty straight forward. Since we don't have a dedicated hot water source right now, we had to cap off the hot water inlet hose on the faucet. We decided that a good water filter would be a must and chose one that would filter sediment, odor, chemicals, heavy metals and parasites. Maybe overkill for rainwater but we're new at this homesteading stuff. :) I'm a bit nervous about the volume of water flow through the filter but we'll cross that bridge when we come to it. We reinforced with a couple of layers of pine to mount the filter to the inside of the cabinet. It takes quite a bit of torque to open and close the filter cartridge so I didn't want to tear out the MDF over time. I also mounted it up pretty high on the cabinet so that I could put a pan under it when I changed the filter. Hopefully, at $50 each, I won't be doing that very often. This would also allow for some supply storage under the filter unit.
 |
| Under counter plumbing with filter installed |
It was really exciting to get rid of the home depot buckets under the sinks! Carrying them to the woods to dump a couple of times a day wasn't the big deal. I was just worried about one of them spilling or overflowing. The scary part of the install was drilling through the bottom of the cabinet and through the floor for the drain pipe and drilling through the back wall of the house for the incoming water line. I think it turned out looking pretty good. No turning back now!
I decided to finish out the shelves next to the refrigerator corner on Friday before Kim came out. I really didn't like my options of using paneling or sheet rock so I decided to see what the pine tongue and groove would look like. It only took about 6 pieces at $4 ea so if we hated it, we could tear it out and start again. I resolved to the fact that the fridge would sit right up against the wall and be too much trouble to try to keep that section of shelves open. I also wanted to keep items from falling off of the shelf and down beside the fridge, so I left a small lip on the trim sitting proud of each shelf. Kim had played with the idea of having some bead board in the kitchen but gave up on it a while back. One side of the pine was routed into a bead board look. This would give us both what we wanted. I don't even care if she paints it. I think it will still look really nice. :)
Here's the before and after.
 |
| Temporary fridge in corner before finishing the shelves and wall. |
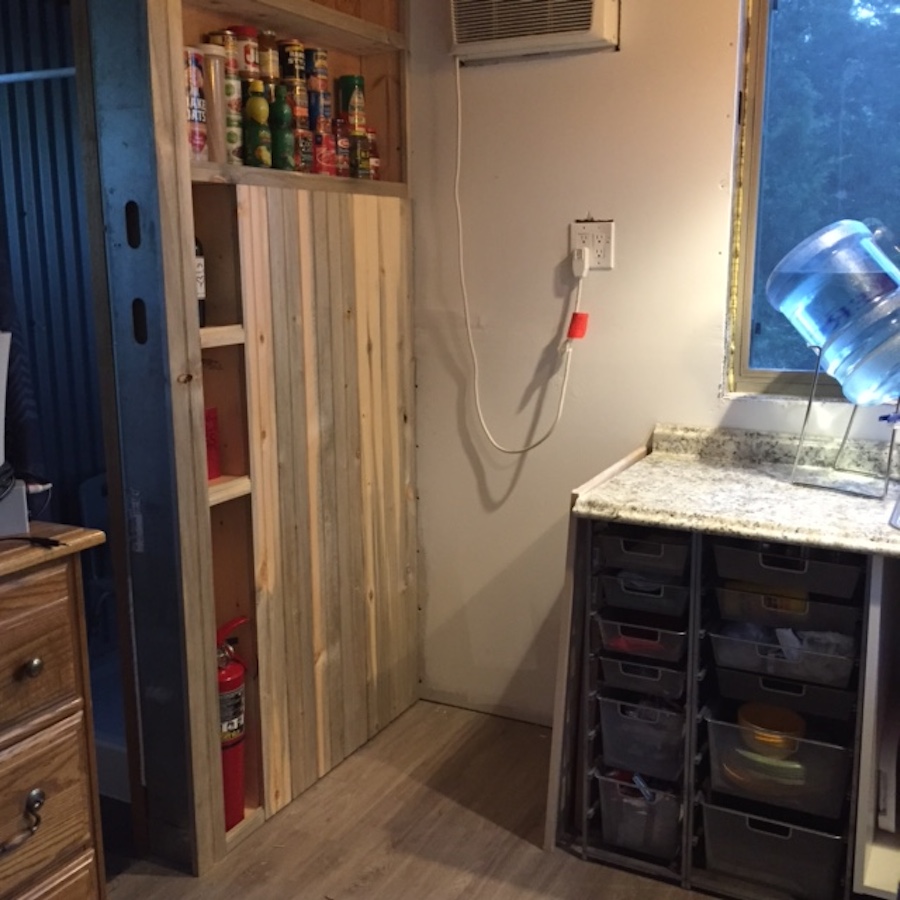 |
| After finishing the shelves and wall. |
We'll get some 1/4" birch or something smooth to line the back of the shelves. I really don't want to eat up too much space as they are only 5 1/2" deep to begin with. I know it doesn't look like a very large space but the top of the AC is at 8' tall. The full sized fridge will fit nicely! Would really like to bring that out in the next couple of weeks. I just want to finish the side of the cabinet/counter top first. Also need to trim out the AC unit and be done with it.
See ya next week!
No comments:
Post a Comment