Tuesday, November 18, 2014

(Nov 18) Financial Reality

I just wanted to put down my thoughts about money and the reality of inflation and how that relates to our wanting to change our lifestyle and move into a Tiny House.

Inflation since 1950 - 988%. This was when my dad graduated high school and went into the work force full time. He is now in his 80s and has to cope with the increase in costs yearly on his social security checks. My mother was a teacher and gets a retirement check through the state of Texas for her 31 years of service. Together, they make about $3,500/month. Lots of things come into play here though. Both of them had to survive and it takes both of their incomes for them to live independently. If either of them passes away, the income is cut in half and would not be enough to make it on their own. They've been lucky in that regard. Many, if not most, of their friends have lost their partner at this point in life.

I wanted to see what it was going to be like for my girls, who are just now graduating and going into the workforce. What are they going to be facing if they live as long as their grandparents? I've worked up the following spreadsheet with costs from the past, present and projected future. It's staggering. If you don't believe the numbers, you're just flat in denial. Those who ignore the past are doomed to repeat it. Ask your parents and grandparents how it feels to live with our current prices - food, healthcare, cars, houses, utilities, etc. They will confirm. They could not have comprehended what was going to happen from the time that they were children to now. Why would it be any different for us. Dad still talks about being able to go out on a date for 25¢. It's about $50 now. What do you think it will cost 60 years from now!? Look at the numbers below with an open mind and an open heart. Think about your prospect to deal with housing, food, healthcare and transportation costs if we keep going down the path we've been following. Let's learn something here!
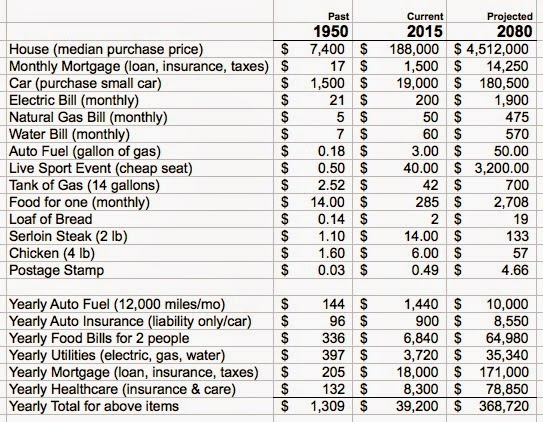


I've talked about cognitive dissidence before. The ability to hold onto two opposing/conflicting ideas at the same time. Yes, it happened in the past. No, it could never happen again, especially to me! This is Exactly why we're pushing so hard to get out of the rat race! Stop giving all of our money to someone else. We need to economize and plan for the inevitable. Prices are going to keep rising. That's the only way the country can keep up with the global economy that we've created. We could put a freeze on all monetary values - income and expenses, and we would no longer have to deal with inflation. That means though that our incomes could never go up but all of the things we get from around the world would continue to rise. We would be stuck in a 2014 economy while the global economics would wash over us. You would never be able to afford to buy anything that was imported or go out of country for travel - business or pleasure.

Think about a couple of economic models that interact right now. Japan and Mexico. We love to go to Mexico for vacation (when we can find some place that's safe) but we rarely consider Japan. Why!? Well, it's $50/night for a room and meals in Mexico City and $500/night in Tokyo. Average worker in Mexico gets about $80/week. Average worker in Japan gets about $1200/week. How many Mexicans do you think go to Japan for vacation if they have to spend 6 weeks salary per night to stay? On the other hand, someone from Japan can stay for about 10 days in Mexico for one day's work. That's why we can't put a freeze on our economy here. We would end up where Mexico is before long.

You have to accept the obvious, that which is in black and white in front of you, prices for everything are going to continue to rise. Our problem as Baby Boomers is that we'll soon be leaving the work force. This means no more opportunity for promotions or raises in income. We will soon enter the "Fixed Income" amusement park where we have a fixed income to spend each month but the rides and food keep getting more expensive every hour that you're there. I can't tell you how many of my contemporaries I talk to that don't see it coming, don't want to see it coming, don't want to talk about it. There aren't enough greeter jobs at Walmart to employ all of us when we hit our 70s and who wants to stand in front of a windy door on concrete all day for minimum wage. All because we 1) didn't plan ahead, 2) thought that somehow, someone was going to step in and take care of us, 3) ignored all of the evidence of the past.

I don't mean to make this a sermon about our wasted years through the 80s and 90s. I just want to confirm why it's imperative that we take dramatic steps to head off this bulldozer, before it has a chance to bury us. Get you housing costs under control. This means mortgage, taxes, insurance, utilities and upkeep! Get your vehicle expenses down to the bare minimum. Learn to grow some of your own food. I'm not saying you have to become a farmer. Just put in a small garden to start with and learn how to take care of it. Get your weight and health under control. This can dramatically help your healthcare costs. You have control over all of this! No one is making you pay for that McMansion and the HOA fees. No one is making you go out to eat every night. No one is making you drive 2 new cars. Find out what you can do about your situation and plan for the future instead of letting it dictate what you must do.

None of us want to be working when we're 75 years old. Just to pay our rent, utilities and food. Go over the numbers above and try to figure out where you fit into that world. Try to set an example for your children and grandchildren of how to plan for the future. This Tiny House lifestyle isn't for everyone. There are lots of people that would gladly work long hours until they are well into their 70s and 80s for the opportunity to give their hard earned money to someone else so that they have a separate bedroom, game room, office, living room and kitchen. Me, for one, I'm willing to live in a smaller space with a common bedroom, living room, office and kitchen so that I don't. Don't have to give 10s of thousands of dollars away each year to someone else. Don't have to pay high taxes, insurance and utilities to support that lifestyle. Don't have to work until I'm so old that I can't enjoy the last ⅓ of my life. Make those hard choices to benefit your own life, your own dream, not financially support someone else's. Bless you all!


Wednesday, November 12, 2014

(Nov 12) Don't Lose Site of Your Goal! Demand a return from your investments!

A short piece I wrote to comment on a family that had spent $58,000 on a solar panel/battery solution for going off-grid.

- - - - - -

We're building a retirement home in the woods of East Texas. We worked up the budget to go off grid. We had solar panel, batteries, inverters, charge controllers, etc. The bill was staggering when you're only paying 9¢/KWHr. It was going to take way too long for our return on investment. The heavy side of the cost equation - the batteries and the charge controller. The heavy side of the labor equation - the batteries and the charge controller. My answer - net metering. On one hand I could buy $6,000 worth of batteries and a $2,000 charge controller - or, I could stay on the grid and put all of my investment into the panels and inverters. All I needed to do was offset the use, I didn't need to become my own power company. I didn't need to store electricity for days at a time. I just needed to buy enough panels to roll my yearly bill back to zero.

I wasn't concerned with the monthly roller coaster. I might have to pay one month but get a credit the next. By the time the year rolled around though, l would have enough credit to carry me into the summer months, air conditioners included. I wouldn't have to worry about monitoring and babying my batteries. I wouldn't have to worry about extended weather conditions that would keep me from charging. I wouldn't have to worry about kicking on my generator when we wanted to run everything at once. I also wouldn't have to worry about replacing my batteries every 7-10 years! This was what sealed it for me. 60% of the cost of the system was going to be battery storage. This was also the weak link in the system! It was finicky about charging, took up huge amounts of space, took the most effort to keep running at peak and to top it off - it wore out the fastest!! What was I thinking! The $6,000 I was going to put into batteries (every ~8 years) could be invested in panels that have a 25 year lifespan and mean that I would never pay another bill for usage.

That was my goal in the first place - not to have to pay an electric bill! I would still have the grid there to back me up when I needed (instead of my generator). The best part, I don't have to do anything to manage it. I don't have to change the way we live or work out schedules of who gets to dry their hair when. We'll go about our business just like normal and at the end of the month, we toast to not having to pay the electric company. Change your mindset. Think about your end game. What is it you really want? Financial freedom! Not to spend your spare time managing your own power plant. Think about your investment in the panels as a barter system if that makes you feel better.

I'm going to buy some solar panels and let the local electric company use them to generate electricity. They, on the other hand, are going to comp my bill in appreciation. Woo Hoo! Batteries are the weak part of the system. They are the most expensive part of the system. They have the shortest life span of the system. It becomes an easy choice once you take them off of the table. Solar panels or pay a monthly bill. Even if they eventually come up with an infrastructure fee to cover the cost of maintaining the grid, that fee would be much lower than my having to buy and maintain (and replace) batteries. I don't want to be a pioneer. I want to throw away my electric bill each month without even opening it! Don't lose site of your goal and get there as quickly and efficiently as you can.

If this family had stayed on the grid, they could have saved about $30,000, every 8 years! They could reinvest part (or all) of this (the first year only) into more solar panels and ensure that they never see another electric bill. All of that without having to put up with changing their lifestyle.

I had a sales rep come to my house one day, wanting to sell me replacement "energy efficient windows." I grant you, they were probably more efficient than what I had but the bottom line was that  the most they could save me was about 10% of my electric bill and at $200 per month, that was only $240 per year in savings. They windows were going to cost $8,000! The question to ask it not whether the windows could save you money. The question to ask, are the windows the best investment choice for the $8,000? If I added another $8K to my 401K (which averages over 10% growth over the past 8 years), could I generate more than $250/year in return (the amount that the windows would produce). I would have $13K at the end of 5 years, an average of $1,600 per year. The windows will only have produced $1,500 worth of savings, 10% interest included in the entire 5 years! Let the 401K run another 10 years, and it's at $35,000. The windows will have only produced $8,000 worth of savings in those years. I will also NEVER get my initial investment back out of the windows. If I don't sell the house, I've just lost the original $8K. If I do sell the house, I'm not going to get $8K over market price because I put new windows in it 7 years ago! The question to ask is not whether an investment will make money. The question to ask is what is your lost opportunity for not investing in something else! This holds true for batteries to go off-grid or for replacement windows. Be careful who you give your money to! Hold them to a standard that you already have access to. Make them beat the current investment options you have or send 'em down the road to someone who doesn't understand their options.

Sunday, November 9, 2014

(Nov 9) Shelves, finally!

We finally got some shelves up. We had built the bathroom wall out of 2x6 material with the intention of leaving one face open to use as a shelf. Well, this weekend, it was time. As we spend more and more time out here, we accumulate more stuff - food, cooking and cleaning supplies, etc. After we got the shelves up, Kim was very excited to have a way to organize and consolidate all of our "stuff". We decided that a wine bottle (Our favorite - Ménage à Trois) would be our standard for height in the kitchen area. In the bathroom, we would have more room for a pantry and shortened the shelves to accommodate more canned goods and such. We debated using 1x material for the actual shelf but concluded that at nearly 4' wide, we would have to put in a center brace. We settled with kiln dried 2x. We would lose ¾" in height for each shelf but they were stiff enough that we felt confident that we could span the opening without a brace. We used our Kreg Jig to prep the 2x shelves to accept the screws. If you have never used one, I highly recommend it. It comes with a template/guide that clamps onto the end of the board along with a collared drill bit that you adjust depending on the thickness of the material. You just clamp on the guide, drill the hole and you have a hidden screw pocket that quick. They also have wood plugs that are precut to fit the holes it leaves if you want to use it on an exposed face. We cut, prepped and hung 10 shelves in about an hour. It went very quickly. We ran out of wood and still have a couple to put up on one wall in the bathroom but we were happy to get these up. I cut some spare 2x material for braces to set the height of the shelf and set them against the walls of the opening. We then dropped in the shelf (with the jig holes cut) and drove the screws. Pull the braces out, set them on the shelf you just put in and you're ready to set the next one. (All of this assumes you have a level surface to start with.) I cut down my braces a couple of times to accommodate a shorter shelf height. One word of caution. Hold down on the shelf pretty firmly as you are driving the screws. Since they're coming up at an angle into the side wall, they have a tendency to lift off of the braces as the screws grabs the material. Once set though, they stay nice and tight. We really like using this jig. Our kit also came with a long square bit drive to fit the screws that they sell for the system. If you use your own screws, be sure to get a 6" driver (phillips or torx) to fit them. A 4" bit is not long enough to reach the depth to fully drive the 2.5" screws into 2x material. Here's a link to the Kreg site if you'd like to check it out. www.kregtool.com . We went with the Kreg HD as we already had lots of clamps. Very nice tool and we use it every chance we get. :)

Wall behind the shower before we put in shelves or AC. 

East wall before the AC unit was installed.

Wall after we put in shelves and installed the AC unit. 

Shelves in the bathroom now. 

We also decided this was the weekend to permanently mount the air conditioner. We got a Frigidaire 8K BTU unit that was EnergyStar compliant. Best Buy had them on sale this summer for $195. This was one of the most efficient units we could find on the market at the time. It has a soft start (easier on the generator) and  pulls about 750 watts on high. I wanted to put it as high as we could on the wall to draw hot air off the ceiling since we're not running a ceiling fan. We decided on a spot above the space reserved for the refrigerator. The unit has a remote control so we won't have to climb up except to clean the filter. We also mounted it high so that we could put in a full sized fridge if we decide. We cut the hole in the wall and framed it in with steel studs. I wanted it tight so I didn't leave much tolerance. When I measured it, I didn't take into account the screws holding the frame together or the fins that held the accordion wings on (which I took off). The wings, I cut off with our grinder but I had to leave the screws. I also didn't account for the flashing that I later put in the window to keep outside moisture from creeping into the opening. All said and done I had an 18 ½" unit and an 18 ½" hole. It took some convincing but I finally got it shoved into place. Not sure we could get any dental floss between it and the opening now. :) We'll put a bead of silicone on it when we're ready to lay the final siding on the outside wall to finish sealing it. I must say, it was a chore to carry it up the ladder and mount it 8' high on the wall but I'm very happy with the end result.

We've debated over and over again about what to do about cooking and heat. I know that many 1000s of people use propane for both, and never have a problem. I also know that when there is a problem, it can be devastating! This happens on a regular basis. Not on a high percentage, but over and over again. There are other health consideration when using gas in that it burns a large portion of the oxygen in the air. Of course, to be properly vented, you would need to keep some kind of fresh air coming into the house whether you used gas or not. Anyway, we have finally decided to use electric to cook with and will decide on our heating option at a later date. Our plan is to have a combination Microwave/Convection oven that will mount under the countertop and then portable burner tops that we can put on top of the fridge and pull down when we need. This way, we get to keep our countertop space where the Stove and Microwave would normally go.  We have just about committed to a small normal sized refrigerator/freezer (12-14 SF). I hate to give up the counter space for it but we have not been very happy with our choices in dorm sized options. Either you give up your freezer to get more fridge space or you give up even more fridge space to have the split freezer. We both agree that we don't need the 25 SF unit that we currently use in Arlington but something bigger than the mini units will be desirable.  -  To this end, we ran some more Romex for the kitchen breakers. Seems we're destined to unload the loft just about every other weekend lately. The good news is that we've decided to leave the flooring on the ground floor until we use it - NO MATTER WHAT. Really got old lifting the boxes of tile up into the storage every time we needed to get to something.

We hope to get the insulation finished next weekend as well as the sheerocking. We'll see if we can stay focused and on target!

Just a funny pic of our cat Topaz. He loves boxes. It's like Christmas every time you leave one open and out! Funny, the best present my girls ever got growing up was a "fort" I made them out of a dryer box. Cut a couple of holes for windows and a door. Give 'em a box of crayons and a pack of stickers and turn 'em loose. It was their favorite play place for nearly 2 years. Wish we were all that easy to please now!


We hope everyone has a great Thanksgiving planned. We'll be celebrating our 6th anniversary that weekend!  Take Care

Monday, November 3, 2014

(Nov 2) Trimming the Shower and Enjoying the Woods

Had plans on Saturday so we only made it out for an afternoon on Sunday. The weather was inspirational! High of about 65° and a very slight breeze. We arrived and Kim got busy with ripping some cedar we had to trim out the shower. My first thought was getting a fire started in the chiminea. Finding wood was no problem as the property is still littered with old and new limbs downed from the storm last month. :( I broke out the chain saw and made quick work of a couple of them. One small limb had fallen on the roof but we haven't found any permanent damage. We really have only two fears from living in the woods.  Well if you ask Kim there are more than two, but one is the nightmare I've had about getting eaten by termites and the other is having one of the really large trees (60'-80' Oaks and Elms) fall on our Tiny House, especially when we're in it! There, I've said it out loud. Maybe this counts in the "face your fears" department.  Kim's fears are the tree-falling-on-the-house and snakes.  Honestly we have only seen one cotton mouth and he was gone as soon as the creek dried up and a couple tiny non poisonous ones that even Kim thought were handsome.  She was absolutely not a fan of the cotton mouth.  He was fairly snarly.  That's about it though. I don't have doubts about the lifestyle that living there will afford. I don't have fears about feeling cramped or closed in by the small footprint. I have lots of woods to work and play in and a pasture full of cows behind us to keep me amused. Kim got her trim put up in the shower and we decided to sit and enjoy the fire for a bit.


More so than usual, the birds came in waves to the feeder today. There were periods where they would all disappear and then, 15 minutes later, they would show back up, all at once, multiple breeds including lots of woodpeckers. Usually, it's a steady stream from 9:00 in the morning until about 5:00 at night. Missing today though were the Cardinals. They seem to be the early risers, sometimes showing up before the sun and usually the last to leave the feeders at night. Maybe the abundance of berries we saw in the woods this week are keeping them happy. After the fire burned down a bit we decided to take a walk and headed towards the back of the property. About half way there, we detoured and made our way along a wide path towards the North. We found a very pretty little spot that we hadn't seen before. There was actually some elevation and a gentle slope down a couple hundred feet away to a dry creek bed.  Funny how we can have areas on our own property that we haven't seen for the 2 years we've been exploring. We found more trees that were broken and ravaged by the storm. Definitely the most damaging in this area for years.  Across a flat creek area there were 2 50' Oaks in the back of the property, broken in half and mounded into a huge debris pile. I may buy a new chain saw before I tackle them or it may just become a bird/snake/raccoon/squirrel/lizard nature preserve. :) I'd have to get pretty bored or desperate for firewood to tackle it any time soon. Having said that, I did get pretty inspired by cutting up some of the wood that's close to the cabin. There are a number of old and dry downed trees, maybe 20-25 that are within a visible circle around the camp that I am going to target now that the weather is out of the 90s. After our walk, we plotted and planned our attack of the bathroom door challenge. Kim has really wanted a sliding barn door for quite a while.  However, we may settle on hanging a curtain in the short term and putting in a sliding barn door for the permanent solution. We really don't want to put the door on the outside wall though since it would narrow the limited space between the bed. Right now, that space is budgeted at about 15". Putting the door on that side would reduce that to about 12". We are also at a quandary about placement of the major kitchen components. We've come to the conclusion we'll end up with a small (not tiny) fridge with a freezer instead of the dorm type fridge we have now. Something around 10-12 SF. The sinks we looked at this weekend were in the 20"-22" range and we've talked about a 20" wide stove/oven. Just not sure I want to give up the extra 6"-8" of counter space for a larger stove.  Kim thought of bringing out some appliance boxes and shape them into realistic sizes so that we can see the effects of placement and functionality. Maybe a solution is to use an under-counter oven with portable burners that we can put away when not in use. This would give us the functionality of a full-sized oven and let us keep the counter space.  We've both come to the conclusion when building a tiny house, you should decide on the appliances and furniture you will be using, THEN plan the space around them. We would have designed the layout differently if we had appliance and furniture dimensions before hand. It's all good though. The journey through all of this is the fun part. For us a huge part of this is about doing it together rather than buying something ready to deliver and set up. That's just us though. We both have a little building experience which helped, but it is absolutely not a must have. We'd love to hear your thoughts on design and layout.


Monday, October 27, 2014

(Oct 27) BluePrints

Thought I would put the design of the cabin out here so that people might get a better idea of scale inside.

Cabin is 12'x20' exterior dimensions.
One door at Living Room side.
9 Windows.
Bathroom is 3'x8' interior.
TV cabinet with rising TV (behind chairs)


This 1st image is with everything closed. The table is locked against the bed closet (between the sink and the sofa) which is closed as well as the table that's against the TV cabinet behind the chairs.


In this image, the table that's attached to the TV cabinet has been opened and the chairs turned around to work/dine in front of the window facing north. I imagine this will be our most common configuration when it's just the 2 of us. You could also open up the kitchen table at this point to accommodate up to 9 people for dinner - 4 at kitchen table, 2 at TV cabinet table in chars and 3 eating off of TV trays on the sofa. Of course, you might have to make reservations for the single restroom in advance, but hey, you've got 12 acres to help accommodate the more adventurous of the group!


In this image, the table hanging from the bed had been extended. Actually, half of the table as it is hinged in the middle.


In this image, the table has been fully extended. The sofa has been moved to the corner for additional space.


Here, the TV Cabinet table has been opened and the bed cabinet has been opened. Notice the bed cabinet, which is 7' tall doubles as a privacy screen for the bed. By using a Queen Short (standard size in RVs), we can maintain 15" between the end of the bed and the bathroom wall for easy passage. It's really nice sometimes to be average height!


Here, the bed cabinet has been opened and the bed lowered as well as the table off of the cabinet door. This now functions as a work/eating table for one person on the sofa. The door to the bed cabinet helps screen off the living area if someone wants to stay up and work on their computer or watch TV. The IKEA closet door can also be opened up to help close off the bedroom area.


Here the dining table has been fully extended to accommodate 2 people sitting on the sofa. You could also pull the chairs around to handle 4 people sitting around the table, 5 if you put a folding chair at the end.


Here the sofa has been opened up as a sleeper as well as the Murphy bed. The bed cabinet acts as a screen between them. We made sure the front door still opens fully for safety. The chairs can be pulled around to face each other and make a small bed for a child. Be sure and secure them together so they don't spread apart in the night.


(Oct 27) Bathroom Progress

I can't believe we are still getting weather in the 90s! it's nearly November! Oh well, gave us incentive to stay inside this weekend and work on the bathroom. My daughter Sabrina and her "dream" of a boyfriend, Triston, came out and spent the weekend with us. We took the 1st 20 minutes just unloading and rearranging to make sure we had room for all 3 beds. A light dinner and we all stayed up to watch Captain America: Winter Soldier. I  must say I slept very lightly with the knowledge that there were 2 teenagers sleeping inches apart! :)

Kim and I got paneling up on 2 walls and the bathroom ceiling tiles installed while Sabrina took Triston for a tour of the property. Nice to have a little more privacy for the bathroom. I was really surprised how easily the tiles went up. We trimmed 'em to size them with a box cutter and a straight edge then used Liquid Nails adhesive to attach them. I did put in a couple of staples in each against the outside edge to secure it until the Liquid Nails dried. We were very pleased with the look. The tiles (18"x24" square) were about $11 ea at Lowe's. It took 8 tiles to cover the 3'x8' bathroom ceiling. More than I'm willing to spend to cover the entire house ceiling but it was worth it in the bathroom. We tried to keep the edges within a quarter inch of the wall as we will trim the ceiling/wall joints with a cedar board. Need to find a longer pipe for the shower head so that Kim can reach it. :)

Scary part was mapping out and cutting holes for the light fixture and shower pipe. 

Before and after of the bathroom area. 

Bathroom walls paneled to ceiling. 

The rest of the South wall will be left open to shelves. We'll start trimming out the inside of the shelves and then trim the openings. We decided to cut the plywood a bit tall to cover the OSB that makes up the deck of the loft. I'll just go back and cut a couple of finger holes in the deck pieces so that we can pull them up and over the plywood if we ever need to take them out to get to the electrical or plumbing that runs through the joists of the loft.

I will also be SO glad when we get a point that we can install the flooring. I can't tell you how many times we have relocated the pile of 30 lb boxes of vinyl tiles. No matter where we put them, that seems to be the next place we need to work. 

Ceiling in shower area. 

We got a grommet cover to cover where the pipe enters the ceiling but did't bother to put it on for the picture as we plan on replacing the brass pipe with galvanized to keep the look consistent. I can't wait to get the cedar trim up. Kim also picked out some galvanized pipes, elbows and footings to attach to the ceiling as a curtain rod. I love the industrial look that she's picked out of the bathroom. 

We ate pretty light this trip but I did grill some salmon with boiled new potatoes along with buttered peas for our last meal on Sunday. I love eating our meals outside, watching the birds flutter to and from the feeders. It's so relaxing. We need to start planning an outdoor hanging bed next. I could have crawled in and slept for hours after lunch! :)

I woke up quite early (for me this time of year) on Sunday at about 5 a.m. and went out to make a campfire. It was so nice to sit there in the coolness of the morning and listen to the woods wake up. The peace ended when a murder of crows got into a squabble over something a couple of hundred feet away. There were about 30 of them fussing and cawing at each other for 5 minutes. After they moved on everything calmed down again. As the sun came up, I wondered down the drive for a brief walk just to get some of the morning stiffness out. As I walked by a metal trash can that we store bird feed in by the cabin, I noticed the lid was covered in fresh blood. It appeared that there were 3-4 other large patches of dried blood on the lid as well. I wondered if it could have been a dog or raccoon trying to get into the food but realized there were no prints on or around the can. I came to the conclusion that it must be an owl using the can as a dining table in the night. I couldn't come up with any other reasonable explanation. If you have any thoughts, please chime and let me know what you think. 

Driveway leading to the front road. 

We also brought back the Go-Kart to get the brakes worked on. It won't be quite as exciting as it has been but it will be a lot safer! :)

Friday, October 24, 2014

(Oct 24) Cub Scouts in MA build a tiny house/cabin w/Deek to raise funds...

Awesome project by Deek at www.relaxshacks.com

You give our Tiny House community a great name and reputation!

Good job!